Roblox Studio is your gateway to building immersive experiences, but getting comfortable with its interface and core operations is crucial for beginners. This hands-on guide walks you through setting up your workspace, saving and publishing your first project, navigating the viewport, and following the built-in tutorial—all updated for late 2026. Whether you’re crafting obstacle courses, role-playing worlds, or your first monetizable game, these fundamentals will have you building confidently in no time.
Prerequisites: Roblox Studio is free and available only for Windows and Mac computers (no mobile support). Download it from create.roblox.com and log in with your Roblox account. For a comfortable experience, ensure your interface is in English (or your preferred language via File > Studio Settings > Language > Restart).
Step 1: Launch and Customize Your Interface
- Open Roblox Studio and click New Experience (or a template like Baseplate) to start a blank project.
- Close all default windows by clicking the X in their top-right corners for a clean slate.
- Reopen the essentials:
- Explorer (docks left): Click View > Explorer (or Home tab). Drag its title bar to the left docking area—it snaps in place. This hierarchical panel lists all objects and services in your experience, like Workspace (your 3D scene).
- Properties (docks right): View > Properties. Drag to the right. Edit object attributes here, like color or speed.
- Output (bottom): View > Output. Drag below the viewport. Monitors errors, warnings, and script messages.
- Resize by dragging edges—your layout auto-saves.
Pro Tip: Studio’s drag-and-drop docking lets you create tabs or float panels. Pin groups to edges for quick access.
Step 2: Saving Your Work—Local vs. Cloud
Studio offers two save types for reliability (“don’t put all eggs in one basket”):
- Save to Roblox (Cloud): Ctrl + S. First time? Fill:
- Name/Description: Keep rule-compliant (moderated on upload).
- Devices: Select platforms (PC/Mobile/Console).
- Team Create: Enable for collaborators.
- Allow AI Training: Opt-in shares data for Roblox AI improvements.
Future saves auto-sync across devices. - Save Locally: Ctrl + Shift + S or File > Save to File As. Exports as .rbxl for backups.
Step 3: Publishing for the World to Play
- File > Game Settings to access advanced configs.
- Open Creator Dashboard (create.roblox.com/dashboard). Complete the Maturity & Compliance Questionnaire for a content label—required for public visibility.
- Under Configure > Settings > Privacy, set to Public (or Beta for testing).
- 2025 Update: To publish/update public experiences, meet one criteria (since Dec 17): ID Verification, real-money purchase/gift card since Jan 1, or prior engagement (e.g., 100+ play hours Nov-Dec 2025). Check at create.roblox.com/settings/eligibility/public-publish. Private experiences remain editable.
Your game now appears in Discover/Search—invite friends via share links!
Step 4: Camera Navigation—Fly Like a Pro
Master viewport movement:
| Key/Action | Description |
|---|---|
| WASD | Forward/Left/Back/Right |
| QE | Up/Down |
| Right Mouse Drag (or Ctrl + Drag) | Orbit view |
| Scroll Wheel | Zoom in/out |
| Shift + Movement | Speed boost |
| F | Focus on selected object |
| Middle Mouse Drag | Pan |
Step 5: Toolbox—Proceed with Caution
The Toolbox (View > Toolbox) offers community models, but skip for beginners: Risk of malware or poor habits. Build from primitives first; revisit later for advanced assets.
Step 6: Hands-On with the Built-In Studio Walkthrough
Start the official tour: File > Close Place (or Ctrl + F4), then Explore Studio > Studio Walkthrough. Follow prompts:
- Insert a “Ball” (search in guide—ignore Toolbox for now). It spawns in Workspace.
- Test: Click Play (top-left, F5). Control your avatar (WASD jump Space). Approach ball, E to ride—needs a launcher!
- Stop (Shift + F5). Home tab > Part dropdown > Wedge.
- Position: Move (2). Drag colored arrows (X=red, Y=green, Z=blue).
- Rotate: Rotate (4). Drag rings.
- Scale: Scale (3). Drag spheres.
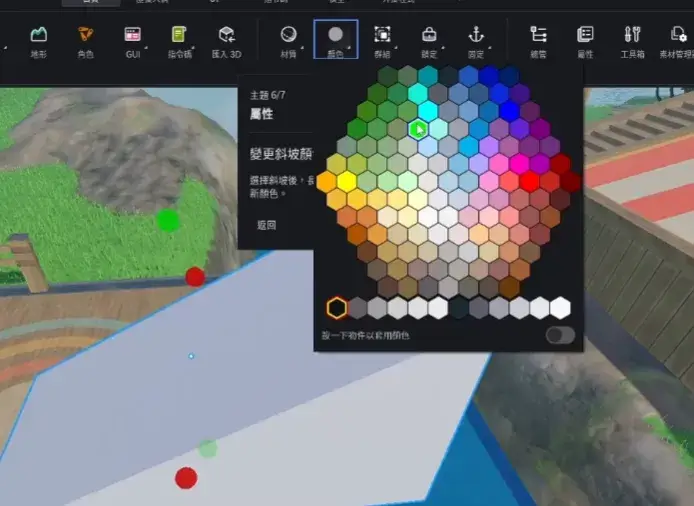
- Color dropdown > Pick hue. Ensure part selected first.
- Anchor (magnet icon): Prevents gravity fall.
- In Explorer > Workspace > Ball, Properties search “Speed”—bump from 50 to 100+.
- Play again—faster launch!
Close without saving (tutorial file). Access recent files via top bar or Experiences tab (personal/group/shared).
Quick Review: Your Core Workflow
- Explorer (Left): Manages hierarchy—Workspace = 3D scene.
- Home Tab Tools: Select (1), Move (2), Scale (3), Rotate (4), Part inserter.
- Properties (Right): Tweak selected items.
- Output (Bottom): Debug info.
- Play/Stop: Test in real-time.
Essential Keyboard Shortcuts (2026)
| Category | Shortcut | Action |
|---|---|---|
| File | Ctrl + N | New Experience |
| Ctrl + O | Open | |
| Ctrl + S | Save to Roblox | |
| Ctrl + Shift + S | Save Local | |
| Ctrl + F4 | Close Place | |
| Test | F5 | Play |
| Shift + F5 | Stop | |
| F6 | Play Here | |
| Tools | 1 | Select |
| 2 | Move | |
| 3 | Scale | |
| 4 | Rotate | |
| 5 | Transform | |
| Explorer | Ctrl + D | Duplicate |
| Ctrl + I | Insert Object | |
| Camera | F | Focus |
| WASD/QE | Move |
(Full list: create.roblox.com/docs/studio – customize via Studio Settings.)
You’re now equipped for modeling, scripting, and more! Next: Dive into Objects and Properties for scripting foundations. Head to Studio, create your first ramp launcher, and publish—your hit experience awaits. Questions? Check DevForum or official tutorials.